mv 2m
Android MVVM lightweight library based on Android Data Binding
The goal of mv 2m is to simplify JVM testing of an Android application. The demo module contains a simple example of usage of mv 2m library. The official app of the Italian blog cosenonjaviste.it is a more complex example (built using Dagger and RxJava). This repository contains the mv 2m porting of android-testing codelab repository.
Mv2m is available on JitPack, add the JitPack repository in your build.gradle (in top level dir):
repositories {

  jcenter()
  maven {
 url "https://jitpack.io"
}

}
and the dependency in the build.gradle of the module:
dependencies {

  //core module
  compile 'com.github.fabioCollini.mv2m:mv2m:0.4.1'
  //RxJava support
  compile 'com.github.fabioCollini.mv2m:mv2mrx:0.4.1'
  //RecyclerView support
  compile 'com.github.fabioCollini.mv2m:mv2mrecycler:0.4.1'
}
Components of mv 2m
Model
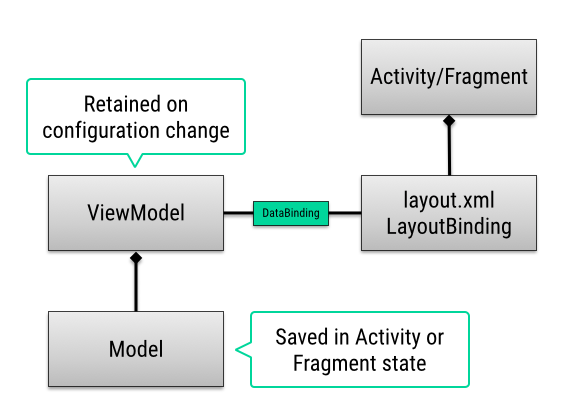
A Model class contains the data used to populate the user interface using Data Binding library. It's saved automatically in Actvity/Fragment state, for this reason it must implement Parcelable interface.
View
The View is an Activity or a Fragment, the user interface is managed using Android Data Binding. You need to extend ViewModelActivity or ViewModelFragment class and implement createViewModel method returning a new ViewModel object.
ViewModel
The ViewModel is a subclass of ViewModel class, it is automatically saved in a retained fragment to avoid the creation of a new object on every configuration change. The ViewModel is usually the object bound to the layout using the Data Binding framework. It manages the background tasks and all the business logic of the application.
JUnit tests
The ViewModel is not connected to the View, for this reason it's easily testable using a JVM test. The demo module contains some JUnit tests for ViewModel classes.
Activity
Sometimes an Activity object is required to perform some operations, for example you need an Activity object to show a SnackBar message or to start another Activity. In this case you can create a new class with some methods with an ActivityHolder parameter:
public class SnackbarMessageManager {

@Override public void showMessage(ActivityHolder activityHolder, int message) {

if (activityHolder != null) {

 Snackbar.make(activityHolder.getActivity().findViewById(android.R.id.content), message, Snackbar.LENGTH_LONG).show();

}


}

}
An implementation of this class can be referenced from a ViewModel object. ViewModel class contains a protected ActivityHolder field containing a reference to the current Activity that can be used as parameter (it's automatically updated every configuration change). In this way it's easy to show a SnackBar from a ViewModel.
In a JVM test SnackbarMessageManager object can be mocked to avoid dependencies on Android framework.
ViewModel argument
ViewModel class has two generic parameters: the type of the argument and the type of the Model class. The argument can be used when the ViewModel needs an argument, for example in a detail ViewModel the argument is the id of the object you have to show. The argument must be an object that can be written in a Bundle (a primitive type, a Serializable or a Parcelable). Using an ActivityHolder object you can start a new Activity passing an argument:
activityHolder.startActivity(NoteActivity.class, noteId);
ViewModel class contains a protected field argument that can be used to load the model data based on the argument.
In case you use Fragments as View objects you can use ArgumentManager.instantiateFragment method to create a new Fragment and set the argument on it.
Work in progress
This library (and the Android Data Binding library) is still a beta version; feedbacks, bug reports and pull requests are welcome!
Talk is cheap. Show me the code.
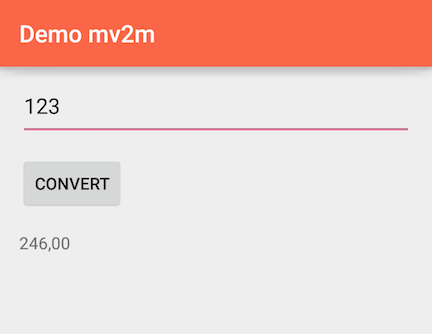
Let's see how to use mv 2m to implement a simple example: a currency converter Activity.
The Model class contains two fields, one is bound with the input EditText and the other with the output TextField:
public class CurrencyConverterModel implements Parcelable {

public ObservableString input = new ObservableString();

public ObservableString output = new ObservableString();

//Parcelable implementation...
}
Using RateLoader class it's possible to load a rate from an external source (for example a REST service), in this first implementation it executes everything synchronously:
public class RateLoader {

private static RateLoader INSTANCE = new RateLoader();

private RateLoader() {


}

public static RateLoader instance() {

return INSTANCE;

}

public float loadRate() {

//...

}

}
All the business logic is in the CurrencyConverterViewModel class, it extends ViewModel class defining two generic parameters: Void (we don't need any argument) and the Model class.
public class CurrencyConverterViewModel extends ViewModel<Void, CurrencyConverterModel> {

private RateLoader rateLoader;

public CurrencyConverterViewModel(RateLoader rateLoader) {

this.rateLoader = rateLoader;

}

@NonNull @Override public CurrencyConverterModel createModel() {

return new CurrencyConverterModel();


}

public void calculate() {

String inputString = model.input.get();

float input = Float.parseFloat(inputString);

model.output.set(new DecimalFormat("0.00").format(input * rateLoader.loadRate()));


}

}
We use the dependency injection on the constructor to manage a reference to a RateLoader object. The createModel method is overridden to create and return a new Model object.
The ViewModel class has no Android dependencies, it can be tested easily using a JUnit test:
@RunWith(MockitoJUnitRunner.class) public class CurrencyConverterViewModelTest {

@Mock RateLoader rateLoader;

@InjectMocks CurrencyConverterViewModel viewModel;

@Test
  public void testConvertCurrency() {

when(rateLoader.loadRate()).thenReturn(2f);

 CurrencyConverterModel model = viewModel.initAndResume();

model.input.set("123");

viewModel.calculate();

 assertThat(model.output.get()).isEqualTo("246.00");


}

}
In this JUnit test we use Mockito to create a mock of RateLoader object, in this way the test is repeatable because it's not dependent on external sources.
Data binding library is used to bind ViewModel object to the layout:
<layout
  xmlns:android="http://schemas.android.com/apk/res/android"
  xmlns:app="http://schemas.android.com/apk/res-auto">

<data>

<variable name="viewModel"

 type="it.cosenonjaviste.demomv2m.core.currencyconverter1.CurrencyConverterViewModel"/>
  </data>

<LinearLayout

android:layout_width="match_parent"

android:layout_height="match_parent"

android:orientation="vertical"

android:padding="16dp">

 <EditText

 android:id="@+id/input"

 android:layout_width="match_parent"

 android:layout_height="wrap_content"

 app:binding="@{
viewModel.model.input
}
">

 <requestFocus/>

</EditText>

 <Button

 android:layout_width="wrap_content"

 android:layout_height="wrap_content"

 android:layout_marginBottom="16dp"

 android:layout_marginTop="16dp"

 android:text="@string/convert"

 app:onClick="@{
viewModel.calculate
}
"/>

 <TextView

 android:layout_width="match_parent"

 android:layout_height="wrap_content"

 android:text="@{
viewModel.model.output
}
"/>

</LinearLayout> </layout>
The app:binding and app:onClick are custom attributes, this post explains how to create them.
The Activity is very simple, it extends ViewModelActivity, overrides createViewModel method, creates the layout and binds it to the ViewModel:
public class CurrencyConverterActivity extends ViewModelActivity<CurrencyConverterViewModel> {

@Override public CurrencyConverterViewModel createViewModel() {

return new CurrencyConverterViewModel(RateLoader.instance());


}

@Override
  protected void onCreate(Bundle savedInstanceState) {

super.onCreate(savedInstanceState);

CurrencyConverterBinding binding = DataBindingUtil.setContentView(this, R.layout.currency_converter);

binding.setViewModel(viewModel);


}

}
Using an Espresso test we can verify that the binding works correctly:
public class CurrencyConverterActivityTest {

@Rule public ViewModelActivityTestRule<Void> rule = new ViewModelActivityTestRule<>(CurrencyConverterActivity.class);

private RateLoader rateLoader;

@Before
  public void setUp() {

rateLoader = Mockito.mock(RateLoader.class);

RateLoader.setInstance(rateLoader);


}

@Test
  public void testConversion() {

when(rateLoader.loadRate()).thenReturn(2f);

 rule.launchActivity();

 onView(withId(R.id.input)).perform(typeText("123"));

 onView(withText(R.string.convert)).perform(click());

 onView(withText("246.00")).check(matches(isDisplayed()));


}

}
Using a ViewModelActivityTestRule we can launch the Activity passing the argument. To use a mock object in this test we defined a method that allows to change the RateLoader instance:
@VisibleForTesting public static void setInstance(RateLoader instance) {

  RateLoader.INSTANCE = instance;
}
The CurrencyConverterViewModel class doesn't manage the parsing exceptions, let's modify the source code to implement it. First we can write the test, in case of a parsing error we verify that a message is shown using a MessageManager object:
@RunWith(MockitoJUnitRunner.class) public class CurrencyConverterViewModelTest {

  @Mock RateLoader rateLoader;

@Mock MessageManager messageManager;

@InjectMocks CurrencyConverterViewModel viewModel;

@Test
  public void testConvertCurrencyOnError() {

when(rateLoader.loadRate()).thenReturn(2f);

 CurrencyConverterModel model = viewModel.initAndResume();

model.input.set("abc");

viewModel.calculate();

 verify(messageManager).showMessage(any(ActivityHolder.class), eq(R.string.conversion_error));


}

}
Running the test it fails, let's add the try/catch to implement the feature:
public class CurrencyConverterViewModel extends ViewModel<Void, CurrencyConverterModel> {

private RateLoader rateLoader;

private MessageManager messageManager;

public CurrencyConverterViewModel(RateLoader rateLoader, MessageManager messageManager) {

this.rateLoader = rateLoader;

this.messageManager = messageManager;

}

@NonNull @Override public CurrencyConverterModel createModel() {

return new CurrencyConverterModel();


}

public void calculate() {

String inputString = model.input.get();

try {

 float input = Float.parseFloat(inputString);

 DecimalFormat decimalFormat = new DecimalFormat("0.00", DecimalFormatSymbols.getInstance(Locale.US));

 model.output.set(decimalFormat.format(input * rateLoader.loadRate()));

}
 catch (NumberFormatException e) {

 messageManager.showMessage(activityHolder, R.string.conversion_error);

}


}

}
In a real example the RateLoader execute an HTTP request to get the rate, we need to manage threads in the right way. The ViewModel can manage the concurrency in various way, in this example we don't use AsyncTasks or Intent Services because we want to test it using a JVM test.
We can execute the HTTP request in a background thread using an Executor and show the message in UI thread using another executor:
public void calculate() {

  String inputString = model.input.get();

  try {

final float input = Float.parseFloat(inputString);

loading.set(true);

ioExecutor.execute(new Runnable() {

 @Override public void run() {

  try {

model.output.set(new DecimalFormat("0.00").format(input * rateLoader.loadRate()));


}
 catch (Exception e) {

uiExecutor.execute(new Runnable() {

 @Override public void run() {

  messageManager.showMessage(activityHolder, R.string.error_loading_rate);


}

}
);


}
 finally {

loading.set(false);


}


}

}
);


}
 catch (NumberFormatException e) {

messageManager.showMessage(activityHolder, R.string.conversion_error);


}

}
The loading field is an ObservableBoolean and can be used to show a loading indicator, it's saved in ViewModel (and not in Model) to avoid errors when the application is killed while the task is running.
In a JVM test it's possible to execute all the code synchronously using an custom Executor:
@RunWith(MockitoJUnitRunner.class) public class CurrencyConverterViewModelTest {

  @Mock RateLoader rateLoader;

@Mock MessageManager messageManager;

@Spy Executor executor = new Executor() {

@Override public void execute(Runnable command) {

 command.run();

}


}
;

@InjectMocks CurrencyConverterViewModel viewModel;

//...
}
RxJava support
RxJava support is available in mv2mrx module, it contains RxViewModel class that can be used to manage RxJava Observable.
The same method of the previous example can be written using RxJava:
public void calculate() {

  String inputString = model.input.get();

  try {

final float input = Float.parseFloat(inputString);

subscribe(

  new Action1<Boolean>() {

@Override public void call(Boolean b) {

 loading.set(b);

}


}
,

  rateLoader.loadRate(),

  new Action1<Float>() {

@Override public void call(Float rate) {

 model.output.set(new DecimalFormat("0.00").format(input * rate));

}


}
, new Action1<Throwable>() {

@Override public void call(Throwable throwable) {

 messageManager.showMessage(activityHolder, R.string.error_loading_rate);

}


}
);


}
 catch (NumberFormatException e) {

messageManager.showMessage(activityHolder, R.string.conversion_error);


}

}
The subscribe method is defined in RxViewModel class, it manages the RxJava Observable connecting it to the Activity lifecycle: it is paused and resumed (using a replay hot observable) when the Activity is paused and resumed and destroyed when the Activity is "really" destroyed (not on a configuration change).
Using retrolambda the code can be simplified a lot:
public void calculate() {

  String inputString = model.input.get();

  try {

float input = Float.parseFloat(inputString);

subscribe(

  loading::set,

  rateLoader.loadRate(),

  rate -> model.output.set(new DecimalFormat("0.00").format(input * rate)),

  t -> messageManager.showMessage(activityHolder, R.string.error_loading_rate));


}
 catch (NumberFormatException e) {

messageManager.showMessage(activityHolder, R.string.conversion_error);


}

}
If we don't define the scheduler to use in the JVM test the observable is executed synchronously:
@RunWith(MockitoJUnitRunner.class) public class CurrencyConverterViewModelTest {

  @Mock RateLoader rateLoader;

@Mock MessageManager messageManager;

@InjectMocks CurrencyConverterViewModel viewModel;

@Test
  public void testConvertCurrency() {

when(rateLoader.loadRate()).thenReturn(Observable.just(2f));

 CurrencyConverterModel model = viewModel.initAndResume();

model.input.set("123");

viewModel.calculate();

 assertThat(model.output.get()).isEqualTo("246.00");


}

//...
}
License
Copyright 2015 Fabio Collini  Licensed under the Apache License, Version 2.0 (the "License");
 you may not use this file except in compliance with the License. You may obtain a copy of the License at
http://www.apache.org/licenses/LICENSE-2.0 Unless required by applicable law or agreed to in writing, software distributed under the License is distributed on an "AS IS" BASIS, WITHOUT WARRANTIES OR CONDITIONS OF ANY KIND, either express or implied. See the License for the specific language governing permissions and limitations under the License. 
