WinKal
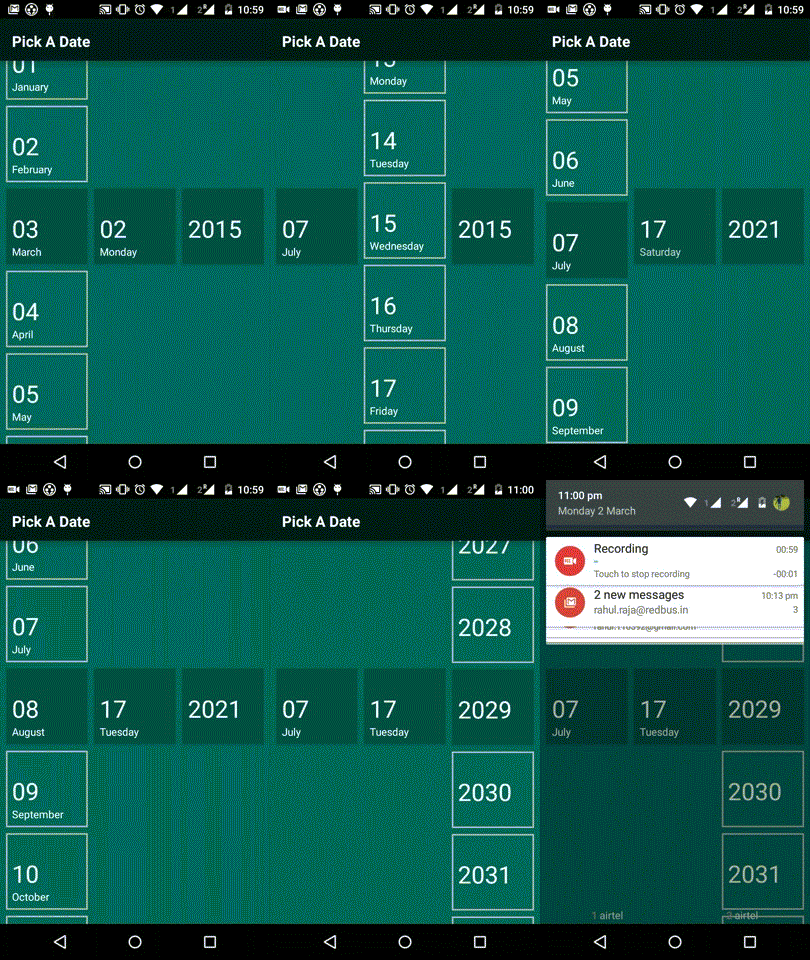
I noticed someday when i was working on a windows Phone app that what awesome Date and Time Picker Windows
Phone has as compared to Android. That time i still had Android 4.0 and 2.3 and neither of these have good date and time pickers. But now Google has released a very nice DTPickers and Flavien Laurent has made a library for it. But i wanted to see the Windows DTPicker in Android and here it is.
It can be customized and used with the cool animations of Material Designs to produce a really nice DTPicker UI.
Demo
Usage
Gradle
For now, its not hosted anywhere. So for including it in the project, import it in Android Studio and in the working project,specify compile project(':WinKal') in the build.gradle file.
Eclipse
For people using Eclipse( still!!!), you can import this project in Eclipse. In Project->Properties,check isLibrary option. Also this library depends on android-support-v7-appcompat library and android-support-v4.jar, so for this library make sure you add andorid-appcompat and v4 jar in it. In project.properties,change target to android-21 if its not there. Now you can add this project as a library for other project.
How To Use?
The picker can be used as a Fragment or as a DialogFragment. The Activity that i have used in the sample app is an ActionBarActivity. I have put the "Done" button on it. In general, the activity should have an ActionBar in it in any case, otherwise the central selected element will change its position.
Setting as a Fragment
The main Fragment used here is DatePickerFragment. So to set it up on an Activity( the activity should have an ActionBar in it, just use the following code. The following code will set up the DatePicker with Today's date on it.
mDatePickerFragment=new DatePickerFragment();
 transaction.replace(R.id.container, mDatePickerFragment);
 transaction.commit();
Or if you want to pass custom date to set on it, you can put the values in arguments and pass like the following.
DatePickerFragment dpFragment = new DatePickerFragment();
 Bundle args = new Bundle();
 Calendar cal = Calendar.getInstance();
 args.putInt(Constants.MONTH, cal.get(Calendar.MONTH) + 1);
 args.putInt(Constants.YEAR, cal.get(Calendar.YEAR));
 args.putInt(Constants.DATE, cal.get(Calendar.DAY_OF_MONTH));
 dpFragment.setArguments(args);
  FragmentTransaction t = getSupportFragmentManager().beginTransaction();
 t.replace(R.id.container,dpFragment);
 t.commit();
Setting as a DialogFragment
Although i will describe how it can be set as a DialogFragment, but currently,there is Done button in the MainActivity, which cannot be accesses if it is used as DialogFragment. Also going with its design, it wont look good an a DialogFragment. So i am working on these two things.
But if you can find a way to move the Done button elsewhere and it looks good to you, here it is
  mDatePickerDialogFragment=new DatePickerFragment();

FragmentManager manager=getSupportFragmentManager();

if(savedInstanceState!=null){

mDatePickerDialogFragment.restoreStatesFromKey(savedInstanceState,"CALENDAR_SAVED_STATE");

}

else

  mDatePickerDialogFragment.show(manager,"Dialog");
Getting the values back from it
To get the selected date back from the DatePicker fragment to the Activity( MainActivity in my sample project), you can use a callback.
  DateSelectListener dateSelectListener=new DateSelectListener() {

 @Override

 public void onSelectDate(int date, int month, int year) {

mSelectedDate=date;

  mSelectedMonth=month;

  mSelectedYear=year;

Toast.makeText(MainActivity.this, "" + month + " " + year + " " + date, Toast.LENGTH_LONG).show();


}

}
;

 mDatePickerFragment.setDateSelectListener(dateSelectListener);
Customization
There are functions available to customize the color and background of every component here. These functions can be used before setting the fragment in the activity.
  public void setBackgroundDrawable(int resId);
 // set color or drawable for calendar background
public void setSelectedRowBackground(int resId);
  // set the color or drawable for selected row
public void setListRowBackground(int resId);

//set color or drawable for ListView rows
public void setListRowTextColor(int colorId);

 // set textcolor for ListView rows
 public void setSelectedListRowTextColor(int color);
  // set textColor for selected ListView rows
Handling rotation
To handle rotaion, these methods are provided
public Bundle getSavedStates();
 public void saveStatesToKey(Bundle outState, String key);
 public void restoreStatesFromKey(Bundle savedInstanceState, String key);
 public void restoreDialogStatesFromKey(FragmentManager manager, Bundle savedInstanceState, String key, String dialogTag)
Using above methods, while rotation, the current state and variables can be saved in the Activity as
@Override protected void onSaveInstanceState(Bundle outState) {

  // TODO Auto-generated method stub
  super.onSaveInstanceState(outState);

if (mDatePickerFragment != null) {

mDatePickerFragment.saveStatesToKey(outState, "CALENDAR_SAVED_STATE");


}

}
and the values can be restored in onCreate(Bundle savedInstanceState) as following
if (savedInstanceState != null) {

mDatePickerFragment.restoreStatesFromKey(savedInstanceState,

"CALENDAR_SAVED_STATE");

}
  // If activity is created from fresh else {

Bundle args = new Bundle();

//put params in args
mDatePickerFragment.setArguments(args);

}
If you use this as a DialogFragment, you can use restoreDialogStatesFromKey
final String dialogTag = "CALENDAR_DIALOG_FRAGMENT"; if (savedInstanceState != null) {

mDatePickerDialogFragment.restoreDialogStatesFromKey(getSupportFragmentManager(),

 savedInstanceState, "DIALOG_CALENDAR_SAVED_STATE",

 dialogTag);

  Bundle args = dialogCaldroidFragment.getArguments();

  args.putString("dialogTitle", "Select a date");

}
 else {

  // Setup arguments
  Bundle bundle = new Bundle();

  // Setup dialogTitle
  bundle.putString(Constants.DIALOG_TITLE, "Select a date");

  mDatePickerDialogFragment.setArguments(bundle);

}
P.S: The rotation handling has been adapted from Caldroid
To Be Done
Make the library independent of ActionBar
Adding more customization options for Colors etc.
